Most homeowners ignore cracks in their basement floor. “It is just the floor,” they say. “It is not holding up the house.”
While it is true that most basement floors are not structural, a crack in the floor is an open invitation for two unwelcome guests: moisture and radon gas. If you have a crack in your basement floor, you are essentially living above a perforated lid on top of wet soil.
This guide covers the four things you need to know: why basement floors crack in the first place, what causes them to leak (and when leaks are actually coming from somewhere else), how professional repair works versus why hardware-store patches fail, and what the work costs. By the end you will know whether your crack needs immediate professional attention or just monthly monitoring with a pencil mark.
If you are in Massachusetts, our basement floor crack repair service page covers service-area details and direct scheduling.
Why Basement Floors Crack
First, a quick note: when people say “cement floor,” they usually mean concrete. Cement is just one ingredient in concrete (cement + sand + gravel + water = concrete). Your basement floor is concrete — typically 3-4 inches thick — and unlike the foundation walls that hold up your house, the slab is not structural. Builders pour it thinner with less reinforcement. Cracks are almost inevitable.
Concrete is great at handling compression but poor at handling tension. Almost every basement floor will eventually develop a crack from one of three causes:
Shrinkage. As concrete cures, it loses water and shrinks. If the slab is too large or lacks control joints, it cracks to relieve internal tension. These hairline cracks are cosmetic and typically appear within the first few years.
Settling. If the soil underneath the slab was not properly compacted during construction, the floor can drop slightly, causing spiderweb or map cracking. This is more common in homes where the builder rushed the backfill process.
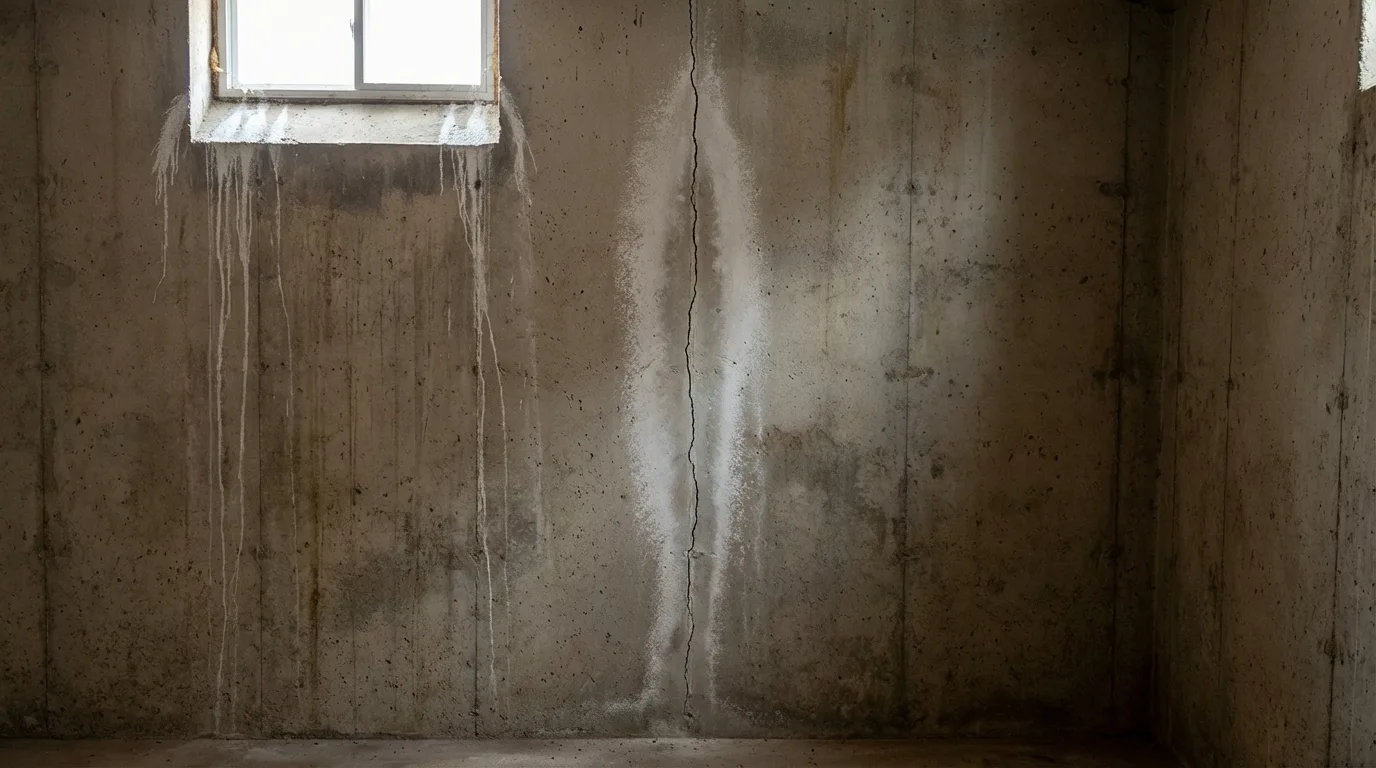
Hydrostatic pressure. This is the serious one. When the water table rises under your house, it pushes up against the bottom of your floor. If the pressure is high enough, it cracks the concrete and starts seeping water through. This is the cause that turns a cosmetic crack into a wet basement, and it is the dominant cause we see across New England’s clay-heavy glacial till. The next section covers it in detail.
When Floor Cracks Leak Water: Hydrostatic Pressure Explained
A crack alone does not guarantee water. You need both a crack (the pathway) and water pressure (the force). When both exist, water finds the crack and uses it as a path of least resistance into your basement.
Hydrostatic Pressure
This is the number one cause of basement floor leaks. When soil around and beneath your foundation becomes saturated, it creates pressure that pushes water upward through any available path — including floor cracks, the cove joint where wall meets floor, and even the porous concrete itself in extreme cases. Your basement slab is essentially sitting in a bathtub of wet soil. When saturation reaches a tipping point, water forces its way up.
Rising Water Table
In parts of Connecticut and Massachusetts, seasonal water table fluctuations are dramatic. Glacial till and clay-heavy soil dominate the region, holding water rather than draining it. During spring snowmelt or extended rainy periods, the water table can rise to slab level — turning a dormant crack into an active leak overnight. Coastal areas, low-lying neighborhoods, and properties downhill of higher ground all see this pattern more often.
Poor Exterior Drainage
If your grading directs water toward your foundation instead of away from it, or your gutters dump water next to the house, you are concentrating moisture exactly where you do not want it. Hydrostatic pressure builds where water collects, and basement floor cracks are downstream of every grading and drainage decision around your house.
The good news: many minor seepage cases get solved at the surface level — by fixing grading, extending downspouts, and clearing window wells — before any crack work is needed. The drainage-vs-sealing decision comes up later in this guide.
Floor Cracks vs. Wall Cracks: Where the Water Actually Comes From
Before assuming you have a floor crack problem, check your foundation walls during the next rainstorm. We see this regularly: homeowners assume water on the basement floor is coming up through floor cracks when it is actually entering through wall cracks and running down to the floor.
This distinction matters enormously for cost and approach.
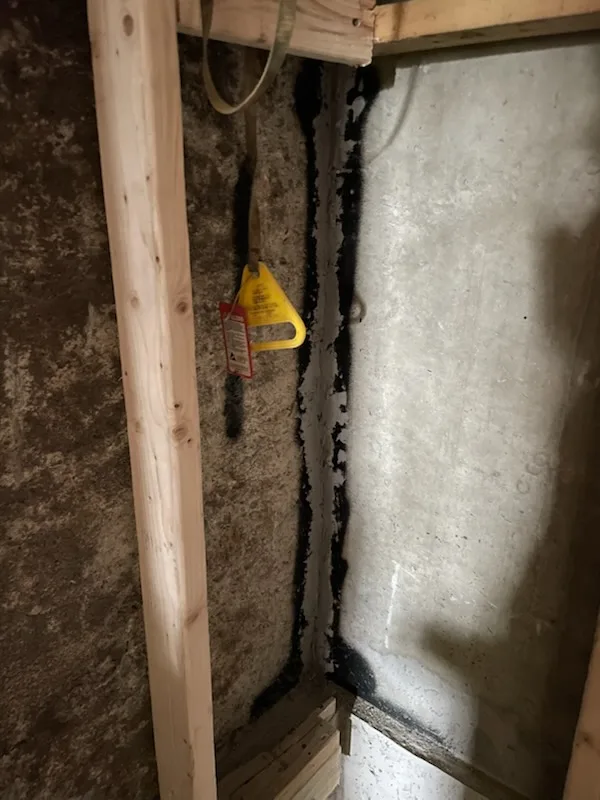
Wall cracks can usually be injected from the interior. Water enters through a discrete crack in the foundation wall — a vertical or diagonal hairline that may not be obvious from the outside. Our foundation crack injection service seals wall cracks permanently with a lifetime guarantee, typically for $800-$1,300 per crack.
Floor cracks behave differently. Water comes up from beneath the slab driven by hydrostatic pressure. The crack is the path of least resistance, but if you seal one floor crack, water under pressure may simply find another route — through another crack, along the cove joint, or through the porous concrete itself.
How to tell which one you have:
- During an active leak, look at your walls before the floor. Wet streaks on walls, water stains at specific points, or dampness along the cove joint where wall meets floor all point to wall cracks.
- Water across the floor without a single entry point suggests hydrostatic pressure rather than a discrete crack.
- Water only after heavy rain or snowmelt often points to a specific entry point that crack injection can seal permanently.
- Water during dry periods too suggests groundwater issues that may need a sump-pump-based solution.
If your water is from a wall crack, that is a simpler fix than dealing with potentially numerous points of entry in the floor and a rising water table. Spend ten minutes investigating before assuming you have a hydrostatic-pressure problem.
Why Hardware Store Patches Fail
The most common DIY fix is to buy a tube of gray caulk or a bag of hydraulic cement and smear it over the crack.
Here is why that approach does not last: surface patches do not bond deeply into the crack. Because the floor is constantly moving — vibrating from footsteps, shifting with temperature changes, responding to soil moisture levels — a rigid patch like hydraulic cement will simply pop out within a year. When water is being pushed upward at pressure from a high water table or saturated glacial till, that surface patch is fighting hydraulic force. It may hold for a few months, then fail.
Silicone caulk is flexible enough to handle movement, but it does not bond well to concrete and has no structural strength. It fills the surface of the crack without sealing the path underneath. Same result: water finds its way around the patch within months.
Hardware-store epoxy crack-filler kits are slightly better — they bond to concrete to some extent — but they still only fill the top of the crack. They cannot reach the depth where the water is actually traveling.
Surface patches are useful for one thing: as an emergency band-aid before professional repair. They are not a real fix.
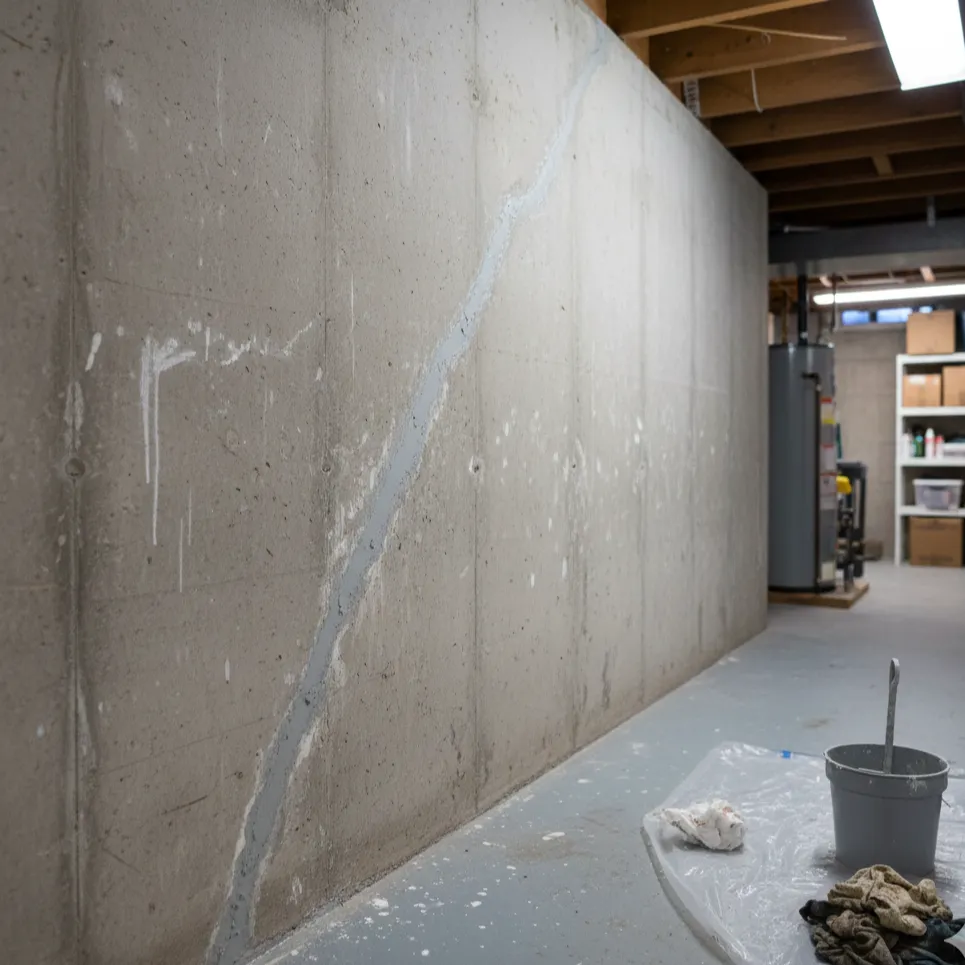
Professional Repair: Grind and Seal
To fix a basement floor crack permanently, you need to remove the damaged concrete and replace it with a material that bonds properly and resists water pressure from below.
Our process involves three steps:
- Grinding out the crack. We use a diamond grinder to open up the crack, removing all loose and deteriorated concrete. This creates a clean channel with fresh concrete surfaces — the critical preparation step that DIY repairs skip entirely.
- Self-leveling epoxy or rubber seal. Depending on the crack and conditions, we fill the prepared channel with self-leveling epoxy (which bonds to both sides of the crack and cures harder than the original slab) or a commercial-grade rubber surface seal (which stays flexible to accommodate minor seasonal movement). Both materials flow into the full depth of the prepared channel and create a waterproof, gas-tight barrier.
- Flush finish. The repair is smoothed level with the surrounding floor, creating a clean result that is ready for foot traffic within hours.
The result is a repair that is nearly invisible once cured, permanently sealed against both water and soil gas infiltration, and built to handle the real-world conditions of a New England basement.
Repair Methods Compared
| Method | Cost | Durability | Waterproof? | Radon Seal? | Best For |
|---|---|---|---|---|---|
| Professional grind & seal (epoxy/rubber) | $500–$1,500 | Permanent | Yes | Yes | Any active crack, finished basements |
| Polyurethane foam injection | $300–$800 | 10+ years | Yes | Partial | Narrow cracks with active water |
| Hydraulic cement (DIY) | $20–$50 | 6–12 months | Temporary | No | Emergency patch only |
| Silicone caulk (DIY) | $10–$20 | 6–12 months | No | No | Cosmetic only — not a real fix |
| Epoxy crack filler kit (DIY) | $30–$80 | 1–3 years | Partial | No | Minor cosmetic cracks, no water |
The professional methods (grind & seal, injection) work because they bond deep into the crack and seal the full depth. DIY surface patches fail because they only cover the top — water and gas find their way around them within months.
One important caveat: when hydrostatic pressure is the underlying cause, sealing the crack alone may not solve the water problem. The next section covers that decision.
How to Fix Leaking Floor Cracks: Drainage vs. Sealing
The right repair depends on whether your crack is a discrete entry point or a symptom of a broader pressure problem.
For Minor, Occasional Seepage
If you only see moisture during heavy rain or spring thaw, start with the cheap fixes that address water before it reaches your foundation:
- Fix exterior grading. The ground should slope away from your foundation at least 6 inches over the first 10 feet.
- Extend downspouts. Discharge gutter water at least 4-6 feet from the foundation, and farther if your soil drains poorly.
- Clear window well drains. Make sure they are not clogged with leaves or debris.
These exterior improvements reduce the water load on your foundation and may eliminate minor seepage entirely — without any concrete work.
For Persistent or Heavy Leaking
Consistent floor crack leaking usually means hydrostatic pressure is the underlying cause. Sealing one crack does not solve a pressure problem; the water finds another path. The systemic fix is drainage:
- Interior perimeter drain. A channel along the base of the foundation wall, routed to a sump pump, intercepting water before it reaches the floor surface.
- Sump pump. Collects water from the drain system and pumps it away from the house.
We will tell you straight: a single-crack patch will not stop a hydrostatic pressure problem. If the water keeps coming back, the crack was a symptom, not the cause.
When Sealing Is the Right Answer
Sealing alone makes sense when:
- The crack is stable and the leaking is intermittent (a few times a year, not constant).
- You are protecting a finished basement from radon entry as much as water.
- You have already addressed exterior drainage and want a permanent gas-tight, water-tight repair on a known crack.
- A professional has confirmed the crack is the entry point and not a symptom of broader pressure.
Most floor cracks we repair fall into this category. Sealing them properly with a professional grind-and-seal closes a real entry point for water and radon, and it stays closed.
When a Floor Crack Needs Professional Attention
Not every floor crack is an emergency, but you should call a professional if you notice any of these signs:
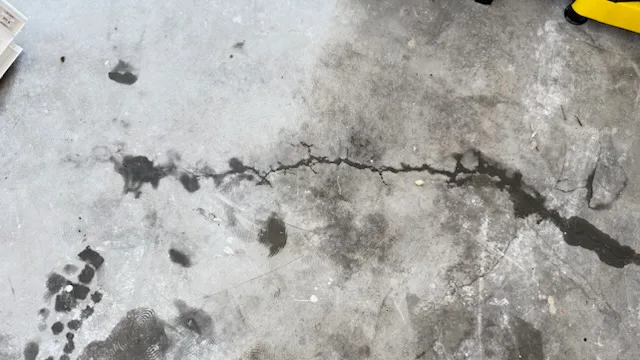
Heaving. One side of the crack is higher than the other. This indicates the slab sections are moving independently, which can signal active soil pressure or frost heave.
Active moisture or efflorescence. Water seeping through the crack, or white powder (efflorescence) deposited along it. Both indicate water is actively moving through the crack.
Widening over time. If you mark the ends of a crack with a pencil and date and it grows past your marks over weeks or months, the underlying cause is still active.
Musty odor. A persistent damp smell rising from the floor suggests moisture is passing through the slab continuously, even if you cannot see standing water.
Cracks in walls AND floor together. Multiple locations suggest broader foundation movement, not isolated slab issues.
Standing water that will not recede. Persistent pooling indicates a continuous water source, not a one-time event after heavy rain.
Cost of Basement Floor Crack Repair
Most basement floor crack repairs cost $500-$1,500 per project, depending on the number of cracks, total length, and repair method required. Multiple cracks are common, and we offer fair pricing for multi-crack projects.
Compare to your alternatives:
- DIY patching compound: $15-$30 per application, but you will repeat it every 6-12 months indefinitely. Total cost over 10 years can exceed the one-time professional repair, and the patches still fail.
- Wall crack injection (if your water is actually from a wall): $800-$1,300 per crack, lifetime guarantee. Often the right answer when homeowners assume the floor is the source.
- Interior drainage system (perimeter drain + sump pump): $8,000-$15,000. The right solution when hydrostatic pressure makes sealing alone insufficient, but a major project that addresses water management rather than the crack itself.
For Massachusetts homeowners, our basement floor crack repair service covers service-area details, the materials we use, and direct scheduling. For wall crack repair (often what is actually causing what looks like floor leaking), see foundation crack injection — that service is available throughout New England.
The right diagnosis matters more than the price tag. A $1,000 floor crack repair cannot solve a $10,000 drainage problem, and a $10,000 drainage system is overkill if your water is actually coming through one wall crack.
Protect Your Finished Basement
If you are planning to install carpet, vinyl, or tile in your basement, fix floor cracks first. There is nothing more expensive than ripping up a brand-new finished basement because water started seeping through a crack you ignored.
The cost of professional floor crack repair is a fraction of what you would spend on flooring replacement, mold remediation, and the aggravation of doing the project twice. It is also the right time to address radon — sealing floor cracks before installing flooring closes the largest soil-gas pathway, which means your finished space starts cleaner.
When to Call a Professional
Start by monitoring the crack. Mark its endpoints with a pencil and date, and check it monthly. Note whether moisture appears after rain events.
For a professional assessment, text us a photo of your floor crack at 617-668-1677 (MA) or call 860-573-8760 (CT). We will examine the crack, determine the cause, and tell you whether it needs repair now, monitoring is sufficient, or — honestly — whether your water is actually coming from somewhere else and a different fix is the right call.For a professional assessment, text us a photo of your floor crack at or call 860-573-8760 (CT). We will examine the crack, determine the cause, and tell you whether it needs repair now, monitoring is sufficient, or — honestly — whether your water is actually coming from somewhere else and a different fix is the right call.For a professional assessment, text us a photo of your floor crack at 617-668-1677 (MA) or call . We will examine the crack, determine the cause, and tell you whether it needs repair now, monitoring is sufficient, or — honestly — whether your water is actually coming from somewhere else and a different fix is the right call.
With 20+ years of work across New England, we have seen every basement-floor pattern these soils produce, and we will tell you what you actually need — even if the answer is “monitor it” or “this is not something we repair.”
For Massachusetts homeowners ready to schedule, see our basement floor crack repair service. For wall crack injection across CT, MA, RI, NH, and ME, see foundation crack injection.